[Note: This is an update of a series of posts that were first written in October, 2009]
In Part 1, we discussed basic cryptography, and worked our way up to symmetrical encryption systems such as AES, which accepts key lengths as long as 256 bits. We also discussed why key length was important to a cryptosystem, and alluded to the fact that there are also asymmetrical systems. An asymmetrical system uses a key pair, such that anything that is encrypted with one key can only be decrypted with the other. The math behind such a system is way beyond the scope of this humble blog, so we ask that you simply take our word for it that such systems exist.
In most systems that make use of key pairs, one of the keys is made public, and the other is kept secret. This is generically called a Public Key Infrastructure, or PKI. Consider the following use cases:
- If you know my public key, you can use it to encrypt a message that only I can decrypt – assuming, of course, that I’ve kept my private key truly private.
- I can encrypt something using my private key that can then be decrypted by anyone who has my public key. And since the public key is, well, public, that means pretty much anyone.
The first use case has obvious benefits. But what good is encrypting a message that anyone could theoretically decrypt? Well, if you know my public key – and you have some way of knowing that it’s really mine – then you can be pretty sure that any message that you successfully decrypt with it must have been sent by me (again, assuming that I’ve kept my private key safe). That makes for a pretty good digital signature.
So, the question becomes this: to use some kind of PKI, how can I securely transmit my public key to the people who might want to communicate with me (or authenticate my communication with them), in such a way that they are confident that it’s really my public key? One way, certainly, to get it to you would be to physically hand it to you on some kind of storage medium – which could be a USB flash drive, a CD, or even a piece of paper. If that’s not feasible, perhaps I could give it to someone you trust, who could then give it to you and vouch for its authenticity. That, by the way, is the concept behind “PGP” (which stands for “Pretty Good Privacy”) – you establish a circle of trust, and when Bob sends you Jane’s public key, it’s up to you to decide how much you really trust Bob.
That might be acceptable for exchanging secure e-mail with your friends, but it’s probably not good enough if we’re talking about securing access to your on-line banking system. So how do you know, when you point your browser at, say, www.wellsfargo.com, that the server you end up talking to, which is asking you for stuff like your social security number and password, is really a server that belongs to Wells Fargo Bank? Enter the SSL Certificate.
The next time you’re on your favorite banking or shopping site, click on the little padlock symbol. Exactly where that symbol is will depend on what browser and version you’re running. (These screen captures came from IE v11. It’s worth noting that the new Microsoft Edge browser does not provide a way to actually view the certificate itself.) I’m going to stick with Wells Fargo Bank for now, and break down what you should see if you choose “View Certificate.”
First, you’ll see something like this:
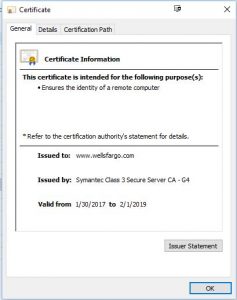
It tells you briefly the purpose for which the certificate was issued (to ensure the identity of a remote computer). It tells you that the certificate was issued to www.wellsfargo.com, and the dates for which it is valid. But how do you know you can trust it? Where did the certificate come from?
Well, if you click on the “Certification Path” tab, it will tell you where it came from:
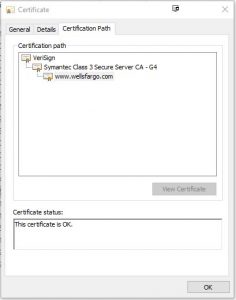
This shows the “chain of trust,” and tells you that the “root” of that chain is VeriSign. VeriSign is one of the public Certificate Authroities (CAs) that companies like Wells Fargo can go to and purchase certificates for purposes such as this. VeriSign is, in fact, probably the best known (and most expensive). But how do we really know that the certificate is valid? Just because it says it came from VeriSign, how do we know it really did?
Hold that thought, and let’s click on the “Details” tab:
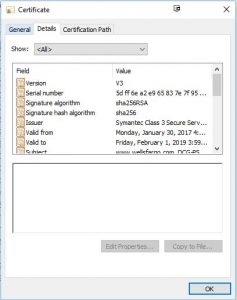
Now we’re getting into the nitty-gritty of the certificate. Note the two fields called “Signature algorithm” and “Signature hash algorithm.” Remember those – we’ll come back to them later. For now, scroll down on the upper portion of the certificate, and highlight “Public key:”
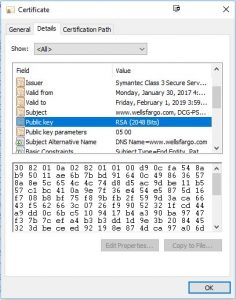
You can now see the actual public key for this certificate displayed in the lower part of the window. Basically, the server is trying to tell you, “Here’s my public key. Use it to encrypt anything that you want to securely send to me.” But, still, how do we know it’s real? How do we know it hasn’t been tampered with?
Scroll down to the bottom of the upper section, and you’ll see a reference to something called a “thumbprint:”
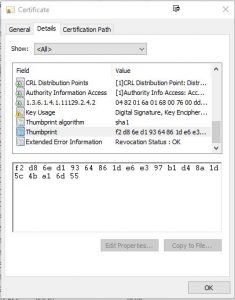
You will also see what algorithm was used to generate the thumbprint – in this case, it’s an algorithm called “sha1.” You probably don’t know what the “sha1” algorithm is, but your PC does. It’s used to generate a “hash value” on the entire contents of the certificate (remember, to your PC the entire certificate is just one long binary number). This is a one-way computation – in other words, it is not possible to look at the hash value, even knowing the algorithm, and work backwards to determine the original value that was used to generate the hash.
So the certificate is signed by running the sha1 algorithm on its contents, and then encrypting the results using the private key of the next-higher certificate in the chain of trust. That encrypted result is transmitted with the certificate as the “thumbprint.” Your computer then takes the contents of the certificate, runs the sha1 algorithm on it, and compares the results with the transmitted thumbprint, which it decrypts using the public key of the next-higher certificate in the chain of trust. If the hash values exactly match, you can be confident that the certificate hasn’t been tampered with – because it would be, for all practical purposes, impossible to tamper with the contents of the certificate without altering the thumbprint value.
Now, back to the basic question of trust. Each certificate in the chain of trust is, in this fashion, digitally signed using the private key of the certificate above it in the chain. You can, in fact, click on any certificate in the chain, click the button labeled “View Certificate,” and examine the details of that certificate, just as we examined the details in the example above. Ultimately, we find ourselves at the VeriSign “root” certificate, and the ultimate question becomes how do we really know that the public key presented in that root certificate, and which we are supposed to use to validate the signature of the next lower certificate in the chain, is valid – since we’ve now come to the end of the chain, and have no higher authority to use to validate the signature of the root?
The answer (which may surprise you) is that the manufacturer of your browser software made a deal with VeriSign to build their root certificate into the browser. To see what I mean, open the “Internet Options” applet in the Windows Control Panel, or, if you’re running IEv11, click on the little gear icon in the upper right corner, and choose “Internet Options.” Click on the “Content” tab, and then click the “Certificates” button. Then click the tab that says “Trusted Root Certification Authorities,” and scroll down. Guess what?
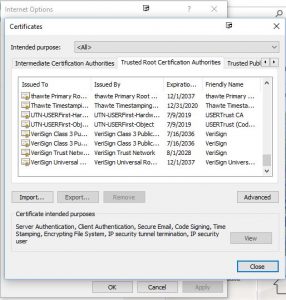
There it is. Ever notice that from time to time Microsoft’s update service pushes out “root certificate updates?” Now you know what that’s all about – they’re either adding certificates to the trusted root certificate store, or replacing ones that are about to expire.
So, now that we know we can trust the certificate that the Wells Fargo Web server presented to us, what do we do with it? Well, we’ve learned two things from the certificate: First, we know that the server we’re communicating with is indeed what it claims to be – part of the www.wellsfargo.com server farm; second, we know that server’s public key. Since we know its public key, we know that we can send information to it securely. However, we don’t want to use the public/private key pair for our entire session, because it so happens that an asymmetrical encryption scheme requires more processing power than a symmetrical scheme – so it would be preferable to use a symmetrical encryption scheme. But we don’t want to just use the same symmetrical key every time, because one of the basic precepts of cryptography is that the more encrypted data you have to work with, the easier it is to break the encryption. Therefore, your PC will use the server’s public key to securely negotiate a session key that will be used to symmetrically encrypt and decrypt just this banking session. Tomorrow, or next week, when you log on again, your PC will negotiate a totally different session key.
In the next post, we’ll talk more about the different kinds of certificates, what they’re used for, and some of the pitfalls of using certificates to secure communications in your own networks.